Building Your Database Lab: Rocky Linux 9 on VirtualBox
Building Your Database Lab: Rocky Linux 9 on VirtualBox⌗
Welcome back! In my previous post, we explored the open source philosophy and Linux distributions. Today, we’re getting hands-on by building a virtual lab environment that will serve as the foundation for our database experiments and learning.
Why Rocky Linux 9? It’s the spiritual successor to CentOS, offering enterprise-grade stability without licensing costs—perfect for database workloads and learning environments.
0. Prerequisites⌗
Before we begin, ensure you have:
- Oracle VirtualBox installed (version 7.0 or later) from virtualbox.org
- Rocky Linux 9 ISO downloaded from rockylinux.org
- At least 4GB RAM available for the VM
- 40GB free disk space
- Virtualization enabled in BIOS/UEFI
Info
The list of official mirrors can be found here, which is advisable for one to select the mirror that is geographically closest to them. To build our lab, the latest release of Rocky Linux 9 is preferred.
Quick Download Commands (Windows)⌗
:: Download Rocky Linux 9 ISO
curl                                 ^
--progress-bar                       ^
--remote-name                        ^
--location                           ^
--output-dir %userprofile%\downloads ^
https://download.rockylinux.org/pub/rocky/9.6/isos/x86_64/Rocky-9-latest-x86_64-minimal.iso

:: Verify checksum integrity
curl                                 ^
--output CHECKSUM                    ^
--silent                             ^
--location                           ^
--output-dir %userprofile%\downloads ^
https://download.rockylinux.org/pub/rocky/9.6/isos/x86_64/Rocky-9-latest-x86_64-minimal.iso.CHECKSUM

type %userprofile%\downloads\CHECKSUM
:: # Rocky-9-latest-x86_64-minimal.iso: 2252013568 bytes
:: SHA256 (Rocky-9-latest-x86_64-minimal.iso) = aed9449cf79eb2d1c365f4f2561f923a80451b3e8fdbf595889b4cf0ac6c58b8

certutil -hashfile %userprofile%\downloads\Rocky-9-latest-x86_64-minimal.iso sha256 | findstr /v "hash"
:: aed9449cf79eb2d1c365f4f2561f923a80451b3e8fdbf595889b4cf0ac6c58b8
Info
The latest stable version of VirtualBox can be found here. However, those who are comfortable with the ‘bleeding edge’ can find the latest version here.
:: Extract what the latest stable version is
:: as of writing this post the latest stable version is '7.1.12'
curl       ^
--location ^
--silent   ^
https://download.virtualbox.org/virtualbox/LATEST-STABLE.TXT
:: 7.1.12

curl https://download.virtualbox.org/virtualbox/7.1.12/ | findstr /c:"Win.exe"
:: <a href="VirtualBox-7.1.12-169651-Win.exe">VirtualBox-7.1.12-169651-Win.exe</a>  14-Jul-2025 20:31  119M

:: Download Oracle VirtualBox
curl                                 ^
--progress-bar                       ^
--remote-name                        ^
--location                           ^
--output-dir %userprofile%\downloads ^
https://download.virtualbox.org/virtualbox/7.1.12/VirtualBox-7.1.12-169651-Win.exe
1. Virtual Machine Creation⌗
You can create your VM either through the VirtualBox GUI or using the powerful command-line interface. For this article, the latter is covered.
Oracle VM VirtualBox offers the following tools to control virtualization engine settings, create new VMs, and work on existing VMs within Oracle VM VirtualBox:
- VirtualBox Manager, the GUI for controlling Oracle VM VirtualBox
- VBoxManage, the CLI to Oracle VM VirtualBox
- The Main API, which is implemented using the Component Object Model (COM/XPCOM)
- The web service, which maps nearly the entire Main API for web applications
1.1 VM Configuration Summary⌗
:: SET will remain only for the duration of the current CMD session.
set "PATH=%PATH%;C:\Program Files\Oracle\VirtualBox"

:: To set environment variables permanently, SETX command can be used
:: setx PATH "%PATH%;C:\Program Files\Oracle\VirtualBox"

VBoxManage --version
:: 7.1.12r169651

VBoxManage list --long ostypes | findstr /c:"RedHat9_64"
:: ID:               RedHat9_64
Name and Operating System:
- Name:
rocky-linux-db-lab - Type: Linux
- Subtype: Red Hat
- Version: Red Hat 9.x (64-bit)
:: --name          The name of the VM
:: --basefolder    Specifies the name of the folder in which to
::                 save the machine configuration file for the new VM.
:: --ostype        Specifies the guest OS to run in the VM.
:: --register      Registers the VM with your Oracle VM VirtualBox
::                 installation.

VBoxManage createvm              ^
--name rocky-linux-db-lab        ^
--basefolder "E:\VirtualBox VMs" ^
--ostype RedHat9_64              ^
--register
Tip
What happens when you no longer need the VM?
The VBoxManage unregistervm command unregisters a virtual machine (VM).
VBoxManage unregistervm rocky-linux-db-lab --delete-all
Hardware:
- Base Memory: 4096 MB (4GB) minimum
- Processors: Assign 2 CPU cores
:: --memory 4096    Allocates 4GB RAM - critical for high-traffic database
::                  workloads
:: --cpus 2         Assigns 2 virtual CPUs from 4 physical cores, leaving
::                  resources for other VMs
:: --vram 16        Minimal video memory allocation since database servers
::                  don't need graphics
::
VBoxManage modifyvm ^
rocky-linux-db-lab  ^
--memory 4096       ^
--cpus 2            ^
--vram 16
Hard Disk:
- Hard Disk File Location: Choose an appropriate location
- Hard Disk File Size: 40 GB
- Hard Disk File Type and Variant: VDI (VirtualBox Disk Image)
- Uncheck
Pre-allocate Full Size - Check
Host I/O Cachefor better performance - Attach Rocky Linux 9 ISO to
Controller:IDE
:: ====================================================================
:: The `VBoxManage createmedium` command creates a new medium, such
:: as a disk image file.
:: ====================================================================
:: --size               Specifies the image capacity in one megabyte units.
:: --format             Specifies the file format of the output file.
:: --variant=Standard   The variant that has a dynamically allocated file size.
:: --filename           Specifies the absolute path name to a file on the host
::                      file system.
:: ====================================================================
:: This creates a 40GB dynamically allocated disk that grows as needed.
:: ====================================================================
VBoxManage createmedium disk ^
--size 40960                 ^
--format VDI                 ^
--variant Standard           ^
--filename "E:\VirtualBox VMs\rocky-linux-db-lab\rocky-linux-db-lab.vdi"
:: ====================================================================
:: The `VBoxManage storagectl` command enables you to attach, modify,
:: and remove a storage controller.
:: ====================================================================
:: --name          Specifies the name of the storage controller.
:: --add           Specifies the type of the system bus to which to connect
::                 the storage controller.
:: --portcount     This specifies the number of ports the storage controller
::                 should support.
:: --hostiocache   Specifies whether to use the host I/O cache for all disk
::                 images attached to this storage controller.
:: --bootable      Specifies whether this controller is bootable.
:: ====================================================================
:: Create SATA controller for the hard disk:
:: ====================================================================
VBoxManage storagectl ^
rocky-linux-db-lab    ^
--name "sata01"       ^
--add sata            ^
--portcount 1         ^
--hostiocache on      ^
--bootable on
:: ====================================================================
:: Create IDE controller for the installation media:
:: ====================================================================
VBoxManage storagectl ^
rocky-linux-db-lab    ^
--name "ide01"        ^
--add ide
:: ====================================================================
:: The `VBoxManage storageattach` command enables you to manage a storage medium
:: that you connectedto a storage controller by using the `VBoxManage storagectl`
:: command.
:: ====================================================================
:: --storagectl        Specifies the name of the storage controller.
:: --port              Specifies the port number of the storage controller
::                     to modify.
:: --device            Specifies the port's device number to modify.
:: --type              Specifies the drive type to which the medium is associated.
:: --medium=filename   Specifies the full path of an existing disk image
::                     to attach to the specified device slot.
:: ====================================================================
:: Attach the virtual hard disk:
:: ====================================================================
VBoxManage storageattach ^
rocky-linux-db-lab       ^
--storagectl "sata01"    ^
--port 0                 ^
--device 0               ^
--type hdd               ^
--medium "E:\VirtualBox VMs\rocky-linux-db-lab\rocky-linux-db-lab.vdi"
:: ====================================================================
:: Attach the Rocky Linux ISO:
:: ====================================================================
VBoxManage storageattach ^
rocky-linux-db-lab       ^
--storagectl "ide01"     ^
--port 0                 ^
--device 0               ^
--type dvddrive          ^
--medium %userprofile%\downloads\Rocky-9-latest-x86_64-minimal.iso
Audio Settings:
- Uncheck
Enable Audioto avoid unnecessary system load
:: --audio-enabled off    Disables audio completely - not needed for server workloads
:: --usb-ohci off         Disables all USB controllers for security and performance
:: --usb-ehci off
:: --usb-xhci off
:: --graphicscontroller   Specifies the graphics controller type to use.
::
VBoxManage modifyvm ^
rocky-linux-db-lab  ^
--audio-enabled off ^
--usb-ohci off      ^
--usb-ehci off      ^
--usb-xhci off      ^
--graphicscontroller vmsvga
Network Settings:
- Adapter 1: NAT (for internet access)
- Adapter 2: Host-only Adapter (for host machine access)
:: Check if there is any host-only network
VBoxManage list hostonlyifs | findstr /b "Name:"
:: Name:            VirtualBox Host-Only Ethernet Adapter
:: ====================================================================
:: We can create a new Host-Only Network in case there is none:
:: VBoxManage hostonlyif create
:: ====================================================================
:: --ip        Specifies the IPv4 IP address for the network interface.
:: --netmask   Specifies the IPv4 netmask of the network interface.
:: ====================================================================
VBoxManage hostonlyif ipconfig           ^
 "VirtualBox Host-Only Ethernet Adapter" ^
--ip 192.168.56.1                        ^
--netmask 255.255.255.0
:: ====================================================================
:: --nic1 nat              First adapter uses NAT for internet access
:: --nic-type1 82545EM     Intel PRO/1000 MT Server network adapter for high
::                         performance
:: --cable-connected1 on   Ensures NAT adapter is connected
:: --nic2 hostonly         Second adapter for VM-to-VM communication
:: --nic-type2 82545EM     Intel PRO/1000 MT Server for host-only network
:: --cable-connected2 on   Ensures host-only adapter is connected
:: --host-only-adapter2    Specifies which host-only interface to use
::                         (may need to be created first)
:: ====================================================================
VBoxManage modifyvm rocky-linux-db-lab ^
--nic1 nat                             ^
--cable-connected1 on                  ^
--nic2 hostonly                        ^
--cable-connected2 on                  ^
--host-only-adapter2 "VirtualBox Host-Only Ethernet Adapter"
Now you can boot the VM and start the guest installation using the following command, which starts in GUI mode by default, taking you through a standard guest OS installer:
VBoxManage startvm rocky-linux-db-lab
:: Waiting for VM "rocky-linux-db-lab" to power on...
:: VM "rocky-linux-db-lab" has been successfully started.

VBoxManage list --long runningvms | findstr /c:"Name:"
:: Name:                        rocky-linux-db-lab
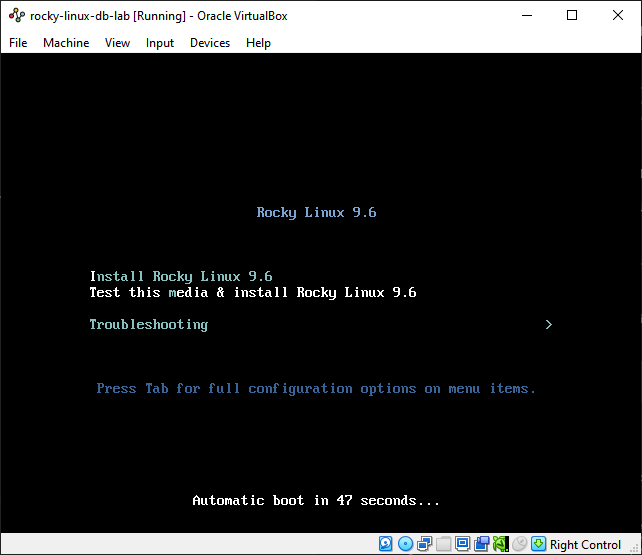
Once you have completed the OS installation, you can cleanly shut down the VM from within the guest, which causes Oracle VM VirtualBox to power off the VM was well. You can also initiate this from
Oracle VM VirtualBox using the following command, which is equivalent to briefly pressing the power button on a physical computer:
VBoxManage controlvm rocky-linux-db-lab acpipowerbutton
Operating systems that are programmed to respond to this command will shut themselves down. You can forcibly shut down a VM using the following command, which is equivalent to pressing and holding a computer’s power button:
VBoxManage controlvm rocky-linux-db-lab poweroff
2. Rocky Linux 9 Installation⌗
Start the VirtualBox virtual machine with Rocky Linux 9.6 ISO mounted. Select “Install Rocky Linux 9.6” from the boot menu and proceed to the Installation Summary screen.
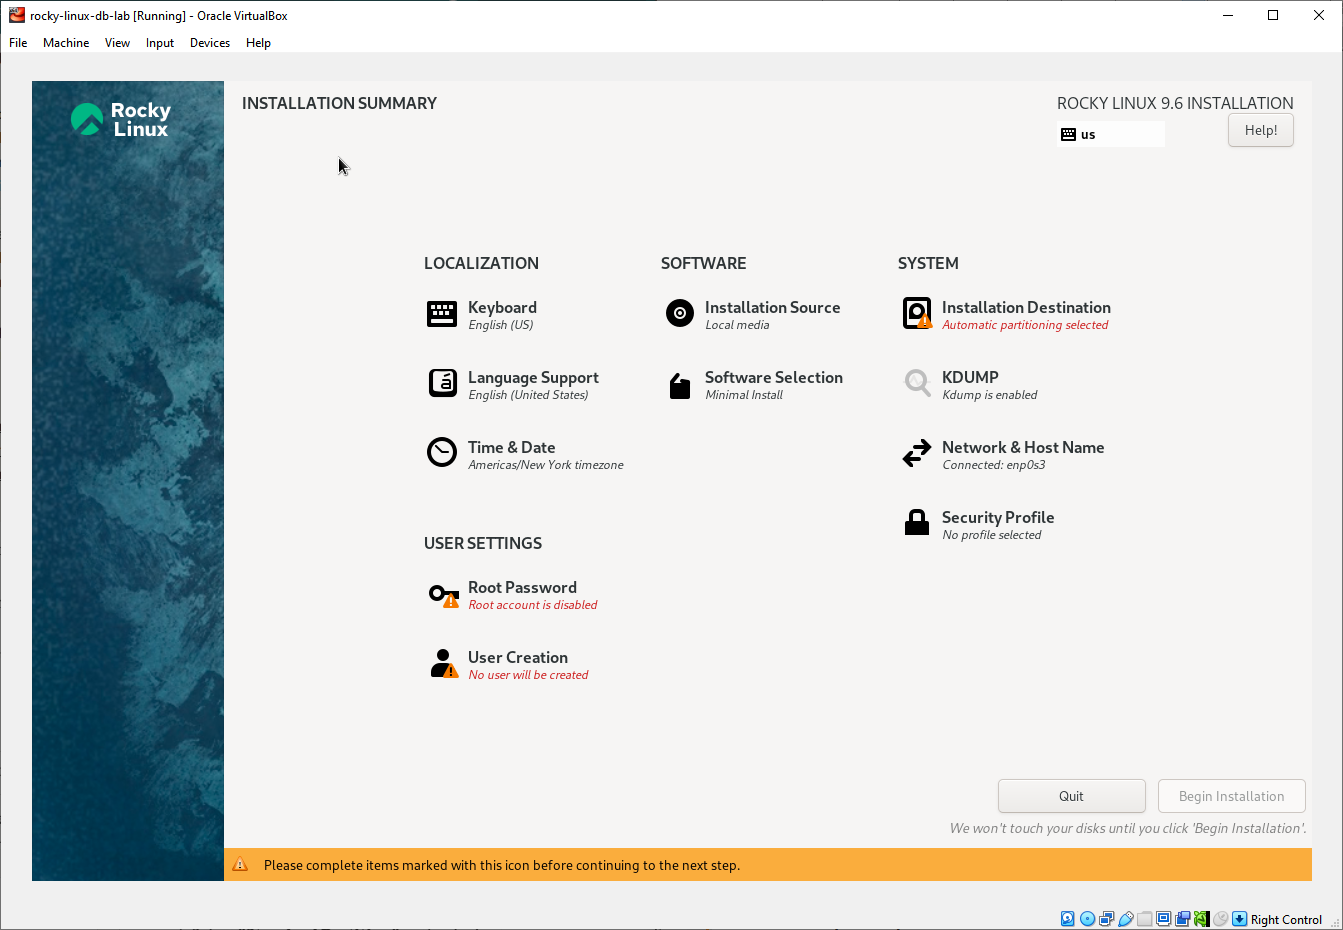
2.1. Installation Summary Configuration⌗
Localization:
- Keyboard & Language Support: Choose the appropriate options for you
- Time & Date: Set your timezone correctly and enable Network Time Protocol (NTP)
Software:
- Software Selection: Minimal Install (recommended for its light-weight)
User Settings > Root Password:
- Root Password: Strong password
- Lock root account: ✗ (later to be disabled)
- Allow root SSH login with password: ✗
2.2. Custom Partitioning for Database Workloads⌗
Access Custom Partitioning⌗
- Click on “Installation Destination” in the Installation Summary
- Select your 40 GiB virtual disk
- Under “Storage Configuration,” select “Custom”
- Click “Done” to proceed to the manual partitioning interface
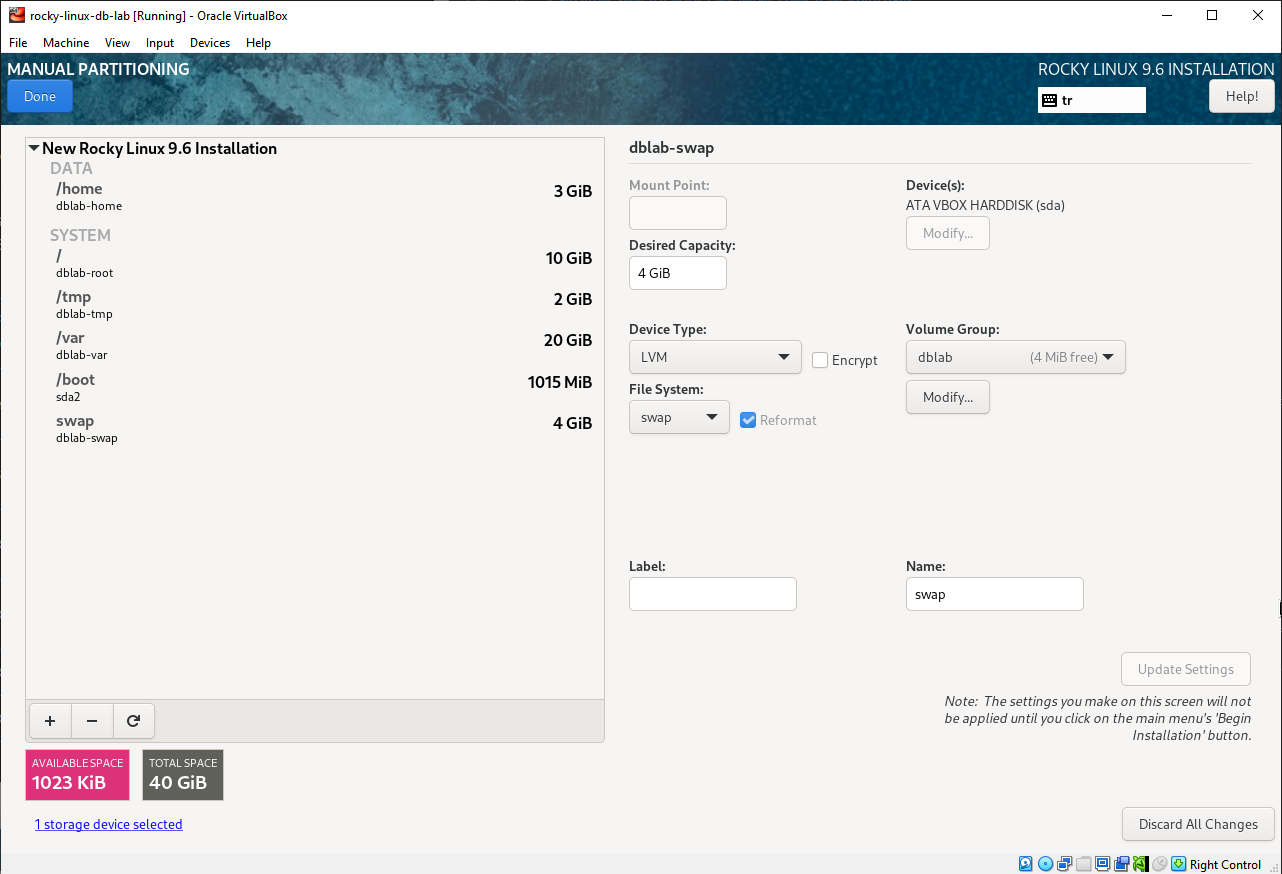
Create these partitions for optimal database performance. The configuration is specifically designed1 for a system with 40 GiB disk space and 4 GiB RAM.
| Mount Point | Size | File System | Purpose |
|---|---|---|---|
/boot | 1 GiB | ext4 | Boot files and kernels |
swap | 4 GiB | swap | Virtual memory (equal to RAM) |
/ (root) | 10 GiB | xfs | Operating system files |
/var | 20 GiB | xfs | Database files, logs, cache |
/home | 3 GiB | xfs | User data and configurations |
/tmp | 2 GiB | xfs | Temporary files |
Why Not Use Automatic Partitioning?
Automatic partitioning typically creates a large root partition that may not be optimal for database workloads because:
- Database files compete with system files for disk space
- No isolation between different types of data
- Limited flexibility for database-specific optimizations
- Difficult to implement targeted backup strategies
- Potential for database growth to impact system stability
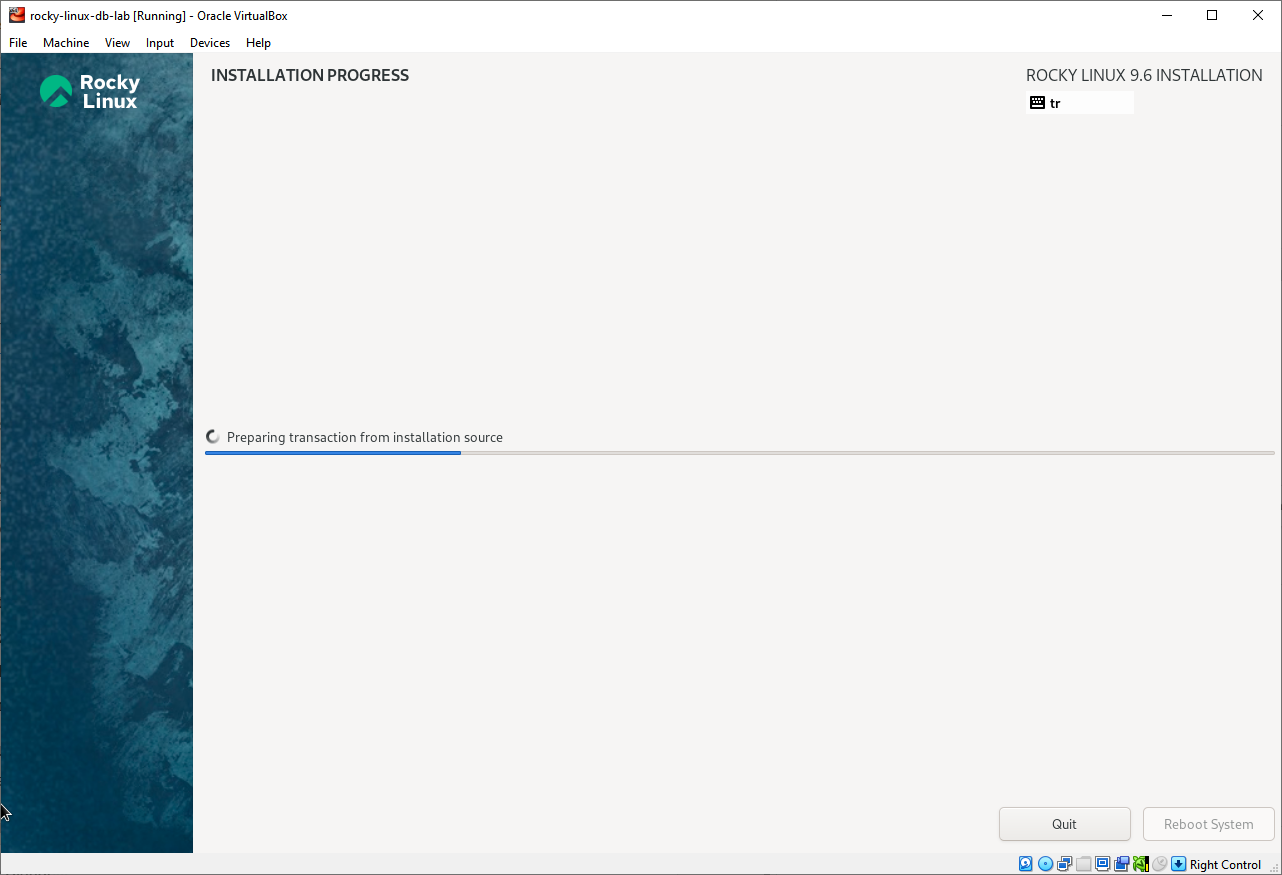
Tip
Finally, when the OS is installed in the guest, you can remove the DVD from the VM configuration:
VBoxManage storageattach ^
rocky-linux-db-lab       ^
--storagectl "ide01"     ^
--port 0                 ^
--device 0               ^
--type dvddrive          ^
--medium none
3. Post-Installation Configuration⌗
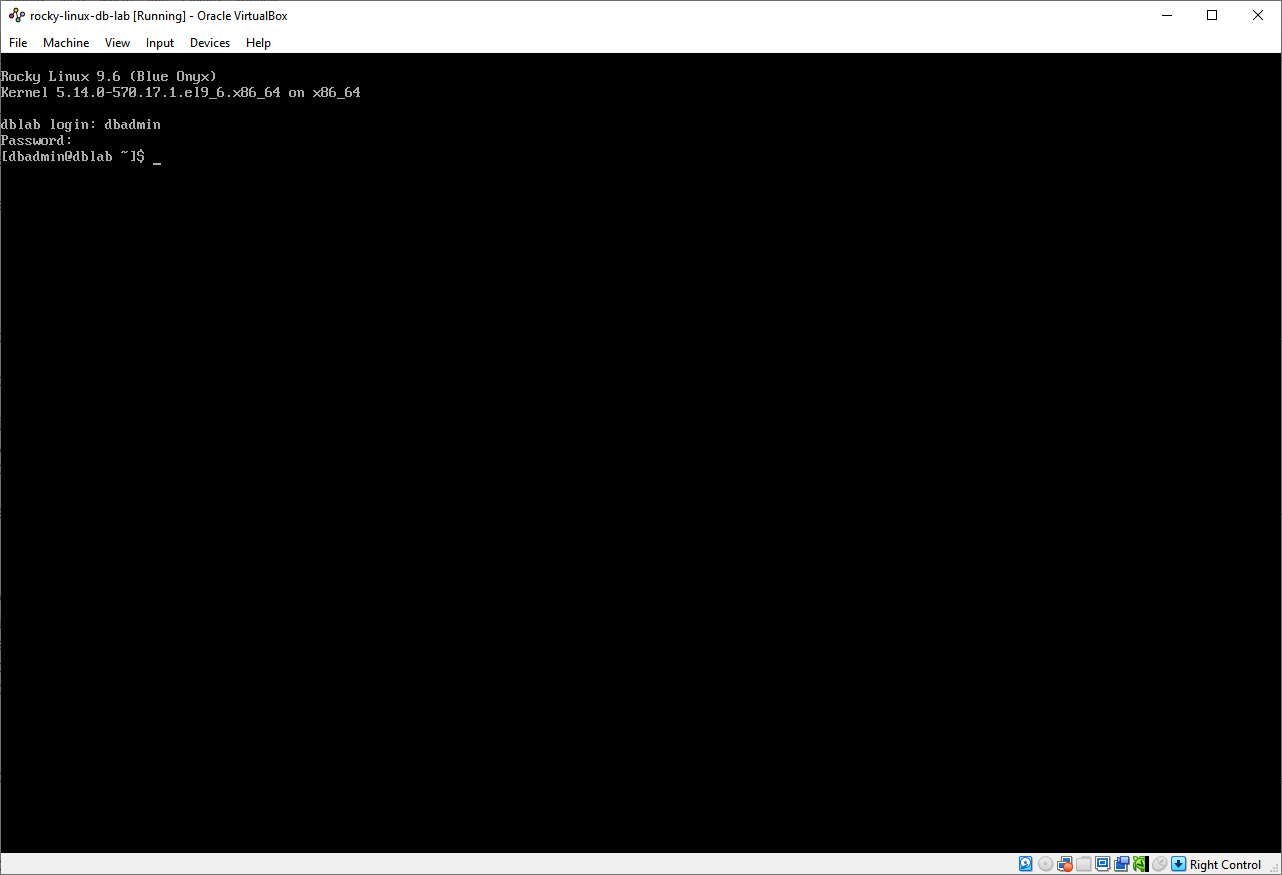
3.1. System Updates⌗
First, update the system completely:
# Update all packages
dnf --assumeyes update

# Install additional useful packages
dnf --assumeyes group install --with-optional 'Development Tools'

# Set a new hostname
hostnamectl set-hostname dblab

# Reboot to ensure kernel updates take effect
reboot
3.2. Security Hardening⌗
Configure Firewall:
# Check firewall status
systemctl status firewalld

# If for some reason firewalld is not enabled on your machine,
# you can enable it with a simple command:
# systemctl enable --now firewalld

# Configure basic rules
grep --silent cockpit < <(firewall-cmd --list-services) && \
firewall-cmd --remove-service cockpit

grep --silent ssh < <(firewall-cmd --list-services) || \
firewall-cmd --add-service ssh

firewall-cmd --add-port 1433/tcp  # SQL Server
firewall-cmd --add-port 1521/tcp  # Oracle
firewall-cmd --add-port 3306/tcp  # MySQL
firewall-cmd --add-port 5432/tcp  # PostgreSQL

firewall-cmd --runtime-to-permanent

# List current rules
firewall-cmd --list-all
Warning
By default, all changes to firewalld’s configuration are temporary. If you restart the whole firewalld service, or restart your machine, none of your changes to the firewall will be saved unless you do one of two very specific things.
Once you have a working configuration, you can save your changes permanently with:
firewall-cmd --runtime-to-permanent
However, if you’re absolutely sure about what you’re doing, and just want to add the
rule and move on with your life, you can add the --permanent flag to any configuration command:
firewall-cmd --permanent [the rest of your command]
SSH Security:
# Create DBA group
groupadd dbadmin

# User management
useradd postgres --gid dbadmin --groups wheel --create-home --no-user-group
useradd oracle   --gid dbadmin --groups wheel --create-home --no-user-group
useradd mysql    --gid dbadmin --groups wheel --create-home --no-user-group
useradd mssql    --gid dbadmin --groups wheel --create-home --no-user-group

passwd postgres
passwd oracle
passwd mysql
passwd mssql

tee --append /etc/pam.d/login 1>/dev/null <<BODY
# Added by [$(whoami)] at [$(date +%Y-%m-%dT%H:%M:%S)]
# The line below allows groups listed in 'groups.allow' to access to login service
auth required pam_listfile.so item=group sense=allow file=/etc/pam.d/groups.allow onerr=fail
# The line below disallow the 'root' user to access to login service
auth required pam_listfile.so item=user sense=deny file=/etc/pam.d/users.deny onerr=succeed
BODY

tee /etc/pam.d/groups.allow 1>/dev/null <<BODY
dbadmin
BODY

tee /etc/pam.d/users.deny 1>/dev/null <<BODY
root
BODY

# Also set the required permissions on this.
chmod 600 /etc/pam.d/groups.allow
chmod 600 /etc/pam.d/users.deny

# To modify the system-wide sshd configuration, create a *.conf
# file under /etc/ssh/sshd_config.d/
tee /etc/ssh/sshd_config.d/00_ssh_security.conf 1>/dev/null <<BODY
# Created by [$(whoami)] at [$(date +"%Y-%m-%d %H:%M:%S")]
PasswordAuthentication yes # for lab environment
PermitRootLogin no
Port 22 # consider changing in production
MaxAuthTries 3
AllowGroups dbadmin
BODY

# Restart SSH service
systemctl restart sshd

# Check SSH service status
systemctl status sshd
3.3. System Monitoring Setup⌗
Install and configure system monitoring:
# Installation epel source (also called repository)
dnf --assumeyes install epel-release

# Many EPEL packages require CodeReady Builder (CRB) repository
# It is recommended to enable the CRB repository
/usr/bin/crb enable

# Install monitoring tools
dnf --assumeyes install htop   # Interactive process viewer
dnf --assumeyes install iotop  # Simple top-like I/O monitor
dnf --assumeyes install iftop  # Display bandwidth usage on an interface by host
3.4. Network Configuration⌗
Configure Static IP for Host-Only Network:
# Identify network interfaces
nmcli device status
# DEVICE    TYPE       STATE                                     CONNECTION
# enp0s3    ethernet   connected                                 enp0s3
# enp0s8    ethernet   connecting (getting IP configureation)    --
# lo        loopback   connected (externally)                    lo

# We did neither configure nor enable the host-only interface,
# so it is safe to assume `enp0s8` is host-only interface

# Configure static IP
nmcli connection modify enp0s8 \
ipv4.address 192.168.56.10/24  \
ipv4.gateway 192.168.56.1      \
ipv4.method manual             \
connection.autoconnect yes

# Show protocol addresses
ip -brief -4 address
# lo       UNKNOWN    127.0.0.1/8
# enp0s3   UP         10.0.2.15/24
# enp0s8   UP         192.168.56.10/24 <-- static IP of this single lab server
4. Verification and Testing⌗
System Health Check⌗
# Check system resources
free --human
df --human

# CPU information
lscpu

# Memory information
cat /proc/meminfo | grep --extended 'MemTotal|MemFree|MemAvailable'
What’s Next?⌗
Congratulations! You now have a robust, secure Rocky Linux 9 environment ready for database installations. This virtual lab serves as the perfect foundation for our database journey ahead.
Final System Verification⌗
Before we wrap up, let’s ensure everything is working correctly:
# Quick system health check
systemctl status firewalld sshd
firewall-cmd --list-all
free -h && df -h
Your system should now show:
- Firewall: Active with DB ports configured
- SSH: Secured and accessible via port 22
- Partitions: Properly configured for database workloads
- Network: Both NAT and host-only adapters functional
Looking Ahead: Your Database Journey⌗
This Rocky Linux foundation opens up exciting possibilities for your database learning path:
Immediate Next Steps:
- PostgreSQL 17 installation and cluster configuration
- User management and authentication setup
- Basic performance tuning and monitoring
Advanced Topics Coming:
- High Availability configurations with multiple nodes
- Backup and Recovery strategies and automation
- Performance optimization techniques and troubleshooting
- Security hardening for production environments
What database are you planning to install first? PostgreSQL for its open-source flexibility, or perhaps Oracle for enterprise features?
Red Hat Documentation 9.15.5. Recommended Partitioning Scheme. ↩︎